There are 5 things I really wish I knew about when I started ios development. If you’re just getting into it now, I think it will help. So let’s jump in.
1. Constraints, Constraints, Constraints!

Constraints are a very important aspect of Objective-C programming as far as GUI is concerned. They allow you to position and size the elements—known as views—on the screen. This is an extremely painful to understand topic when you are first getting to know it.
There are multiple ways of making constraints. For learning purposes I recommend using Interface Builder to play around with them this will give you the quickest, most interactive/visual way to understand how constraints behave.
If you are applying constraints programmatically and running into issues, I always recommend to keep a scrap constraints project available and use it to reenact or stage the same issues you are experiencing with your constraints in code. This will give you a more visual way to troubleshoot them.
With the coming of iOS 8 there is a new debugger tool for constraints that can be used as well, but it only works when you are running the simulator for iOS 8 or higher, so if you’re targeting iOS 7 still it won’t help for much.
If you are creating constraints programmatically you should also have a quick read through LEARN TO LOVE AUTO LAYOUT… PROGRAMMATICALLY. It will teach you VFL. If you can understand VFL, then you will gain a better understanding from the output window when your app is suddenly “Unable to simultaneously satisfy constraints:”
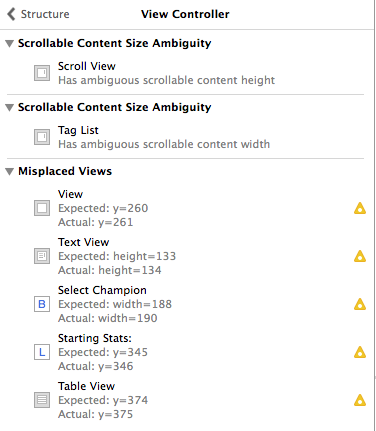
Unable to simultaneously satisfy constraints.
	Probably at least one of the constraints in the following list is one you don't want. Try this: (1) look at each constraint and try to figure out which you don't expect; (2) find the code that added the unwanted constraint or constraints and fix it. (Note: If you're seeing NSAutoresizingMaskLayoutConstraints that you don't understand, refer to the documentation for the UIView property translatesAutoresizingMaskIntoConstraints)
(
    "<NSLayoutConstraint:0x7f9cf2e5bdf0 V:[UIButton:0x7f9cf2e60090(30)]>",
    "<NSLayoutConstraint:0x7f9cf2c8d5d0 V:[UIView:0x7f9cf2c8d620(30)]>",
    "<NSLayoutConstraint:0x7f9cf2c8d8f0 V:|-(0)-[UIButton:0x7f9cf2e60090]   (Names: '|':UIView:0x7f9cf2c8d620 )>",
    "<NSLayoutConstraint:0x7f9cf2c8d990 V:[UICollectionView:0x7f9cf4861000]-(0)-|   (Names: '|':UIView:0x7f9cf2c8d620 )>",
    "<NSLayoutConstraint:0x7f9cf2c8d9e0 V:[UIButton:0x7f9cf2e60090]-(2)-[UICollectionView:0x7f9cf4861000]>"
)

Will attempt to recover by breaking constraint
<NSLayoutConstraint:0x7f9cf2e5bdf0 V:[UIButton:0x7f9cf2e60090(30)]>
2. Use Simpler, Modern Objective-C Syntax
Use Modern Objective-C wherever possible. This includes cleaning up a lot of horrible readability issues with subscripting and literals, but also addresses management of class properties using the @property keyword.
Subscripting
before
NSDictionary* profile = [[[self.data objectForKey:@"profiles"] objectForKey:@"profile"] objectAtIndex:indexPath.row];
after
NSDictionary* profile = self.data[@"profiles"][@"profile"][indexPath.row];
If you don’t want to convert your project manually Xcode provides a refactoring tool for this that will run over your whole project (Edit > Refactor > Convert to Modern Objective-C Syntax…).
Literals
before
[Flurry
  logEvent:@"Purchase Intend"
  withParameters: [NSDictionary
    dictionaryWithObjectsAndKeys:productId,
    @"id",
    [Util getDeviceId],
    @"deviceId", nil]
];
after
[Flurry
  logEvent:@"Purchase Intend"
  withParameters: @{
    @"id" : productId,
    @"deviceId" : [Util getDeviceId]}
];
before
[GALog LogEvent:@"history"
     withAction:@"profile"
      withValue:[NSNumber numberWithInteger:indexPath.row]];
after
[GALog LogEvent:@"history"
         withAction:@"clear"
          withValue:@(indexPath.row)];
3. Use @property where applicable
This is still technically a part of modern objective-c, but I felt it was important enough to call it out as a separate bulletpoint.
It’s important to understand that @property is just a way to automatically generate a setter, getter, and an ivar and that these things are named based on convention.
When I started I had no idea that implementing a method called setId:, which accepts an NSString would allow me to use object.id = @"something" in addition to the more obvious, [object setId:@"something"];
Here’s my short example:
before
Person.h
#import <Foundation/Foundation.h>

@interface Person : NSObject

- (void)setName:(NSString *)name;
- (NSString *)name;

@end
Person.m
#import "Person.h"

@implementation Person
{
    NSString *_name;
}

- (NSString *)name
{
    return _name;
}

- (void)setName:(NSString *)name
{
    _name = name;
}

@end
implementation
Person *bob = [Person new];
[bob setName:@"Bob"];
NSLog(@"Name: %@", [bob name]); //prints Name: Bob

Person *jill = [Person new];
jill.name = @"Jill";
NSLog(@"Name: %@", jill.name); //prints: Name: Jill

//both of these work with same class implementation
after
Person.h
#import <Foundation/Foundation.h>

@interface Person : NSObject
@property (nonatomic, strong) NSString *name;
@end
Person.m
#import "Person.h"

@implementation Person

@end
implementation
Person *bob = [Person new];
[bob setName:@"Bob"];
NSLog(@"Name: %@", [bob name]); //prints Name: Bob

Person *jill = [Person new];
jill.name = @"Jill";
NSLog(@"Name: %@", jill.name); //prints: Name: Jill

//same code, still works both ways
Side note
It should also be noted that since @property is generating iVars, the private variable _name can still be accessed using _name. However, when using self.name (from within the Person class) we are actually making a call to the name method to retrieve our name and the setName: method to assign the value, instead of retrieving/assigning them directly.
4. Advanced Breakpoints
Xcode has a lot of shortcomings, there are lots of things that I hate about it—and I do complain daily—however, discovering some of the debugger’s power has me seeing Xcode in a slightly different light.
Using the Xcode breakpoints you can inspect or even inject values in your code and allow the application to continue over that breakpoint automatically. This allows easier testing for different values and gives you a really nice tool for debugging weird issues in your app. Use it.
- Create a breakpoint
- Right Click > Edit Breakpoint…
- Add action
- Then check Automatically continue after evaluating actions
5. VIPER
VIPER is an iOS application architecture that will help you get better organized for large projects and teams.
I’m not going to preach to everyone and say that you absolutely must incorporate VIPER and strictly adhere to their guidelines for all of your projects, but I do believe that giving the article a thorough read—or two or three—will change the way you think about iOS programming when it comes to architecting your apps.
Again, the main point here is not to use VIPER, necessarily, but to spark your own creativity and help break you free from the ubiquitous Massive View Controller that they mention early on in the article. Just because iOS is using a “ViewController” as a core mechanism does not necessarily tie you to implementing both functionalities (view and controller) in the same place.
blog comments powered by Disqus